Showing posts with label jca. Show all posts

Monday, January 7, 2013

Creating a Business Service to Access a Database Table in OSB


There are several steps that need to be completed before you can create a business service in OSB to access/modify data in a database table.  At a high level you will need to create the JCA Adapter files in JDeveloper, create the data source/connection pools in Weblogic and then import the JCA Adapter files into OSB.  Below are the detailed steps.
1.   Create JCA Adapter in JDeveloper
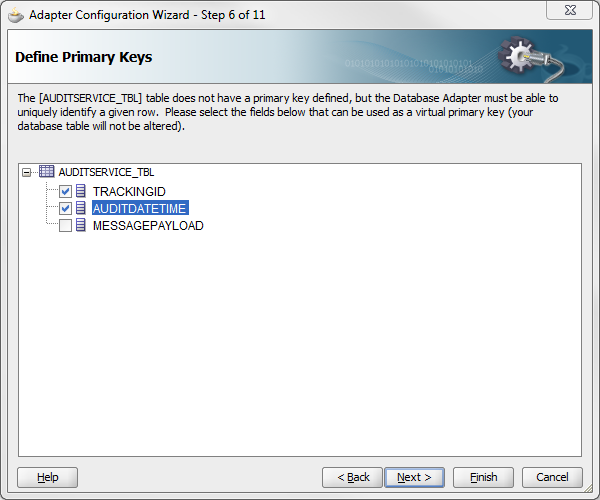
         a.  See Creating a JCA Database Adapter in JDeveloper for more details.
2.  Create a zip file with the JCA Adapter files that you need for the import.  It needs to be in a zip file to import into OSB.  Note: You can get the location of these files by clicking on them in JDeveloper.
         a. Add the following to the zip file
                  i. <Project>.wsdl
                  ii. <Project>_db.jca
                  iii. <Project>_db-or-mappings.xml
                  iv. <Project>_table.xsd
3. Create a New Data Source in  Weblogic
         a.  For more details on this step see  Steps for Creating a New Data Source in Weblogic
4. Link DB Adapter outbound connection pool to a data source
         a. For more details on this step see Linking DB Adapter Outbound Connection Pool to Data Source
5.  Import JCA Adapter files
         a. Log into the OSB Console
         b. Navigate to the project you are working on
         c. Create a directory to hold the JCA Adapter files (<Project>/Resources/jca)
         d. In the Create Resource menu, select Bulk -> Zipped Resources


         e. Select the zip file created in step 2.


         f. Select Next
         g. All of the files that you added to your zip file in step 2 should now be displayed on the Review Loaded Resources page.


         h. Select Import.
         i . Fix Conflicts.   

Note: You will need to fix any path conflicts caused by moving all of the files into the same area. In JDev the schema files are in a different directory.

                  i. Click on View Conflicts.


                   ii. Start by fixing the wsdl conflict as this should resolve all of the conflicts. This can be fixed by changing the schemaLocation.


                  iii. Activate Changes.

4. Create Business Service
         a.  Create WSDL that will be used by the Business Service. This WSDL will have the operations that you specified when you were creating the JCA Database Adapter in step 1.
                  i.  Navigate to the *.jca file that was imported in Step 3 (<Project>/Resources/jca)
                  ii. In the Actions column next to the JCA Binding file imported click on the Generate WSDL and Service from this JCA binding resource button.


                  iii.  Specify the new WSDL Name and New Service Name. Also, choose a location for the new WSDL file. To avoid confusion, we put it in the BuisnessServices folder.


                  iv. Select Generate


Friday, January 4, 2013

Linking DB Adapter Outbound Connection Pool to Data Source

The following steps show how to link a Database Adapter Outbound Connection Pool to a Data Source in Weblogic.  These steps are intended for developers who are making these changes in their virtual machine or in the development environment. 

1.  Log into Weblogic
2. Go under Deployments and select DBAdapter


3.  Navigate to the Outbound Connection Pools tab which can be found by selecting the Configuration tab .  Then select New.


4.   Enter the JNDI Name and then select Next.   The value entered should match the JNDI name from the JCA resource you are using to connect to the database.  This can be found in the *.jca file in the location attribute.   


5.   Add a JDBC name in the xADataSourceName Property and then Save Changes.  This JDBC name should map to the Weblogic Data Source that points to the database you want to connect to.  If you have not already created a Weblogic Data Source, see this page.


Friday, December 28, 2012

Creating a JCA Database Adapter in JDeveloper


Below is an outline of the steps needed to create a JCA Database Adapter in JDeveloper.  Specifically they focus on how to create a JCA Database Adapter that can be imported into OSB.  If you are creating a database adapter for an existing SOA project then you can start on step 7.

1.  Open JDeveloper
2.  Create a new Generic Application


3.  Enter a name  for the Application.  You can reuse this same application to create any JCA Adapters in the future so name it something generic.  For example “Connections”
4.  Create a SOA Project


5.  Create an Empty Composite


6.   Drag the Database Adapter component from the Component Palette into the External References swim lane.
7.   A wizard will pop up which will guide you through creating the JCA Database Adapter.  There are 11 steps in this wizard. 
                a.  Fill in the Service name and then select Next (Step 2).
                b. Select the appropriate connection.  It will automatically fill in the JNDI Name. (Step 3) 


    c.  Select all of the Operation Types you want.  For this example, we will be able to Insert and Select from a table (Step 4).


    d.  Import all of the tables that you want to operate on.  You can import parent/child tables.  In this example, we only have one table (Step 5).


 e.  Define the primary keys (Step 6)


f.   If you have selected multiple tables.  Define the relationships between the tables. (Step 7)
g.  Exclude any attributes that you do not want to have access to.  (Step 8)


h.  If you only want to look at a subset of data from the table(s), then you can write a query to narrow down the data you will see. (Step 9)


i.  Define Advanced Options.  For most cases you can keep all of the defaults. (Step 10)


j. Click Finish.   This will create all of the files that you need to import this JCA Adapter into OSB.